
In this article you will learn:
- What full-management service mode is and how to activate it
- How the service mode interface works
- Frequently Asked Questions
Service Mode with Full Management
Service mode with full management is used to solve problems with WordPress and to repair a website that has stopped working. It always lasts at most 1 hour. After the limit expires or after manual deactivation, the system automatically:
- deactivates service mode in the administration and on the server;
- cleans up the files used and entries in the database.
You activate service mode with the following steps:
- Log in to the Customer Administration ⧉.
- In the top menu, click Hosting services.
- Select the Hosting WP service for which you want to enable service mode. The service name is displayed in the header of the left menu.
- In the left menu, click Tools.
- In the section Service Mode with Full Management click the button Activate.
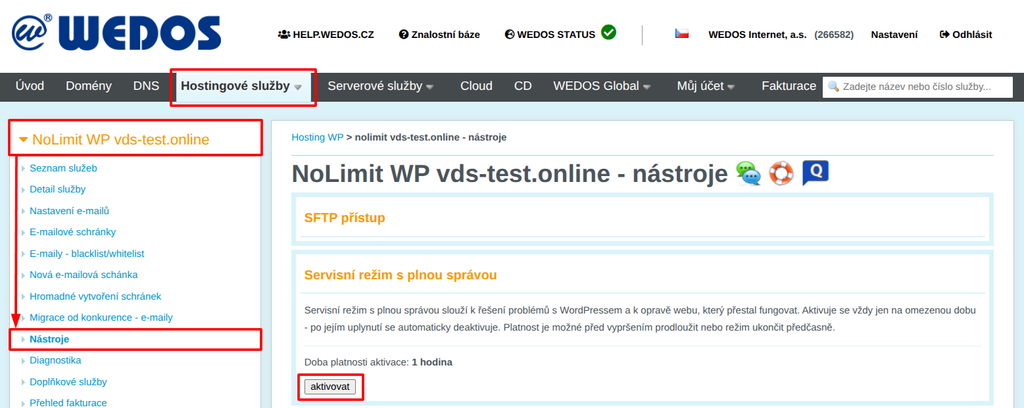
The system enables service mode within 5 minutes. During this time you cannot perform other actions in Tools.
Access to the service interface
If you do not see the login 1-5 minutes after activating service mode, manually refresh the page in Tools.
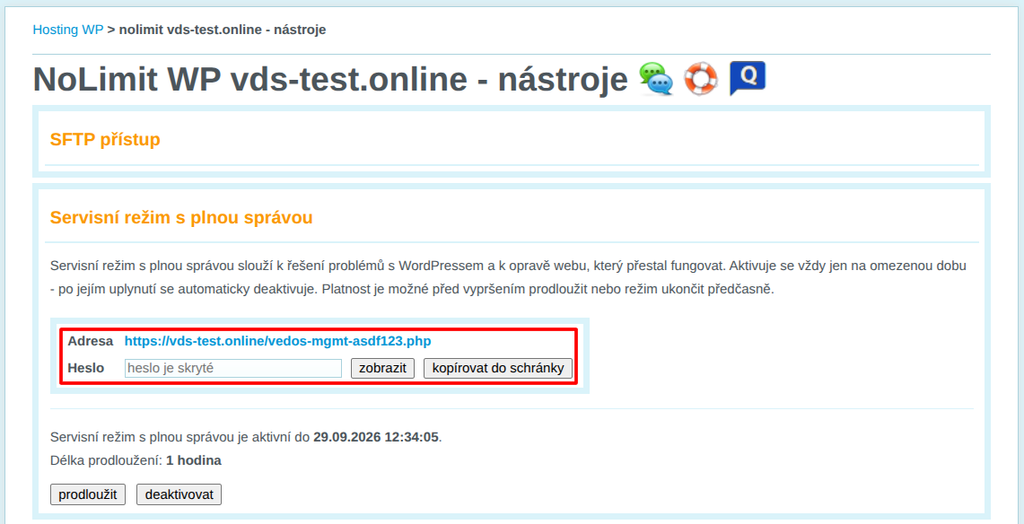
After activation, the system generates an address and a password for access to the service interface. The address is different every time; the system creates it randomly. We do not send these details to you by email; you will find them only in the administration in the section Service Mode with Full Management.
- Address – the link opens the service interface.
- Password – to get the password, click Show or Copy to Clipboard.
Renewal and Deactivation of Service Mode
After activation, the section Service Mode with Full Management displays the date and time until which the mode is running and the length of one renewal (1 hour). Below them you will find two buttons:
- Renew – the system renews the validity of service mode by 1 hour from the original expiration;
- Deactivate – the system ends service mode immediately and cleans up the files used and entries in the database.
Service Mode Interface
Open the service mode address, enter the password and click the button Log In. A page with the following information and controls is displayed:
- Auto-login: With this button in the top bar you log in to the WP interface as a temporary administrator. You will also find the relevant login details here, in case you need to send them to an external administrator.
- Adminer: This button launches the Adminer database management application and logs you in automatically.
- Auto-cleanup: In the top right corner you will find a timer for the start of the automatic cleanup. Any action, including refreshing the page, resets the timer. This value does not affect the deactivation of the interface in the system and in the Customer Administration.
- Site Status: At the bottom of the navigation column you will find a quick assessment of the state of certain parts of the website – the file
wp-config.php, database access and connection, the .htaccess file, WP Debug tools and the Adminer service interface. - Log file: Below the site status you will find a link to download the log of the interventions performed.
Through the navigation column you can reach the following sections of the service interface:
Home
The home page is used for quick login to WordPress and for opening the Adminer database tool.
For quick login, service mode creates a separate account with administrator rights, valid only while service mode is active.
Plugins
This page is mainly used to turn off a plugin that is causing problems with the website. It displays a list of plugins installed in WordPress. The table contains these columns:
- Status – a green dot marks an active plugin, a red one a disabled plugin.
- Plugin – the name of the plugin folder and main file, for example wgpwpp/wgpwpp.php.
- Action – the button Turn Off deactivates the plugin, the button Turn On activates it.
The system changes the plugin status immediately after you click the button.
WP Users
This page is used to manage WordPress users. You can create a new user, change an existing user’s password or delete a user. You will use it mainly when you cannot log in to the administration with your own account.
In the section Add New User you create a new WordPress user. The form contains the following fields:
- Login – login name (required).
- E-mail – the user’s email address (required).
- Display Name – the name WordPress displays.
- Password – if you leave the field empty, the system generates the password automatically.
- Role – the user’s role, by default Subscriber.
After entering the required settings, create the user by clicking the button Add User.
In the section User List you can remove accounts, for example inactive administrators and accounts created when the website was compromised. The table shows all WordPress users in the following columns:
- ID, Login, Name, E-mail – basic user information.
- Role – the user’s role, for example administrator.
- Registered – registration date.
- New Password – enter a new password and click Set.
- Delete – the button removes the user immediately without confirmation. Their posts remain in WordPress without an author.
The temporary service mode account is marked in the list with the label VEDOS.
Site URL
This page is used to check and change the WordPress address. You will use it mainly when the website does not work after an address change or redirects to the old domain.
The table Current URL Configuration Overview compares the WordPress address (siteurl) and the site address (home) according to individual sources:
- Database (wp_options) – addresses stored in the database.
- wp-config.php – addresses specified by the constants WP_SITEURL and WP_HOME. If the file does not define them, the table shows “not defined”.
- .htaccess (RewriteBase) – the state of the WordPress block in the .htaccess file.
- Effective URL – the addresses WordPress actually uses.
The form Change WordPress Address contains the following fields:
- WordPress Address (siteurl) – the address at which WordPress runs.
- Site Address (home) – the address at which visitors open the website.
- Copy – the button copies the value from the field WordPress Address to the field Site Address.
In the section What to Update select where the system writes the new address:
- Database – the system overwrites the records siteurl and home in the table wp_options.
- wp-config.php – the system overwrites the constants WP_SITEURL and WP_HOME. If the file does not define them, the option is inactive and the system changes nothing.
- .htaccess – the system modifies RewriteBase and RewriteRule in the WordPress block. You need this option only when changing a subdirectory.
You save the changes with the button Save New URL.
Adminer
This page is used to manage the website database through the Adminer tool. You will find these elements on it:
Deployment Status
- Adminer is deployed as – the name of the file Adminer runs on. The system generated it randomly.
- DB host, Database, User – details of the database Adminer connects to.
- Open Adminer (auto-login) – the button opens Adminer and logs you in to the database without entering credentials.
- Direct Link – the address at which Adminer runs.
Deployment Management
- Redeploy Wrapper – the button deploys Adminer again.
- Delete Adminer – the button removes Adminer from the server.
Cleanup
This page is used to end service mode manually. After you click Perform Cleanup the system irreversibly:
- deletes the temporary WP account (if it exists);
- deletes all log files vedos-log-*.txt;
- deletes Adminer;
- deletes the service mode script.
After the cleanup you can no longer enter the service interface. If you want to use service mode again, activate it in the administration.
Frequently Asked Questions
What if service mode turns off before I finish the repair?
Before it expires, click in the administration on Renew. The system renews service mode for 1 hour from the original expiration.
Where do I find the address and password for service mode?
We do not send the address or the password by email. After activation, you will find them in the administration in the section Service Mode with Full Management. The address is different every time because the system generates it randomly.